

In the pursuit of sustainable and cost-effective water pumping solutions, transitioning to solar-powered water pumps stands out as an environmentally conscious choice. We will be going through the step-by-step installation process for solar water pumps in a detailed manner. We shall also look into the common questions regarding installation and maintenance as well.
When it comes installing a Solar Water Pump, it consist of a 4 step process, lets look into it one by one
Step 1: Site Selection and Sun Exposure
Choose a location that receives maximum sunlight exposure throughout the day. Confirm that the site allows for proper orientation and angle adjustment of the solar panels to capture the most sunlight. Proper sun exposure is very much important for the efficiency of the entire solar water pump system.
Step 2: Proper Sizing of the Solar Water Pump System
- Determine Water Requirements: Identify the specific water needs of your application, whether it’s for irrigation, domestic use, or other purposes. Accurately calculate the volume of water required to ensure the solar water pump system is appropriately sized.
- Match Solar Panel Capacity: Align the solar panel capacity with the power requirements of the pump. This matching ensures that the system operates efficiently, harnessing sufficient solar energy to power the pump effectively.
Step 3: Quality Components and Professional Installation
- Invest in High-Quality Components: Choose reliable and durable components for your solar water pump system, including the pump itself, solar panels, controller, and any additional accessories. High-quality components contribute to the system’s long lasting performance
- Consider Professional Installation: If you are not familiar with electrical and plumbing work, it is advisable to hire a professional installer, who could set the system correction and reduce the risk of error or malfunctions
Step 4: Battery Storage for Continuous Operation
- Assess System Design: Determine if your solar water pump system is intended for intermittent or emergency use. If so, consider integrating a battery storage system to ensure continuous operation during periods of low sunlight or power outages.
- Properly Size and Configure Battery Bank: Ensure that the battery bank is appropriately sized to meet the pump’s power requirements. Upon installation ensure the batter system can provide necessary back up
Can I Install a Solar Water Pump Directly to the Solar Panel?
Connecting a solar water pump directly to the solar panel is not advisable. Atlthough it may seem convenient, but it can lead to issues and may affect the lifespan of the Solar
Solar pump. Its is best to use a control unit.
Here’s why:
- Voltage Regulation: Solar panels generate varying voltages based on sunlight intensity. Connecting the pump directly to the solar panel without regulation can expose the pump to fluctuating voltage levels, potentially causing damage over time.
- Control Unit Functionality: A control unit regulates the power flow from the solar panels to the pump, ensuring a stable and consistent supply of energy. It protectthe pump from being overloaded or damaged due to power fluctuations.
- Optimal Performance: Using a control unit allows for better control and optimization of the solar water pump system. It ensures that the pump receives the right amount of power, maximizing efficiency and performance.
When installing a solar water pump, always follow the manufacturer’s guidelines and recommendations. Including a control unit in your system is a crucial step to safeguard the pump and ensure a trouble-free operation. If you are uncertain about the installation process or lack experience in electrical work, it is advisable to seek the assistance of a professional installer to guarantee a correct and secure setup.
What Are the Key Steps to Install a Solar Water Pump?
Breaking down the installation process into key steps provides a clear roadmap for those venturing into solar water pump installation. Starting with the site assessment, then moving on to component assembly, water source connection, and solar panel integration, this step-by-step approach simplifies the process. Emphasize the importance of adhering to the manufacturer’s guidelines at each stage for optimal results.
Installing a solar water pump involves several key steps to ensure a successful and efficient setup. Here is a comprehensive guide to walk you through the process:
1. Site Assessment:
Begin by selecting a location that receives maximum sunlight exposure throughout the day. This ensures optimal energy production for the solar panels. Confirm that the chosen site allows for proper orientation and angle adjustment of the solar panels to capture the most sunlight.
2. Water Requirement Determination:
Identify the specific water requirements for your intended application, whether it’s for irrigation, domestic use, or other purposes. Calculate the volume of water needed to determine the appropriate size for the solar water pump system.
3. Solar Panel Sizing:
Match the solar panel capacity to the power requirements of the pump. It ensures that the solar water pump system operates efficiently by using sufficient solar energy to power the pump
4. Component Assembly:
Assemble the necessary components, including the solar pump, solar panels, controller, and any additional accessories. Follow the manufacturer’s guidelines carefully during this process to ensure proper integration and functionality.
5. Water Source Connection:
Establish a water source for the pump, whether it involves digging a borewell or tapping into an existing water supply. Connect the pump to the water source, ensuring a secure and leak-free connection.
6. Solar Panel Integration:
Connect the solar panels to the solar water pump system. Verify that the panels are correctly positioned and oriented for maximum sunlight absorption. Follow the provided instructions to connect the panels to the controller and pump.
7. Control Unit Installation:
Include a control unit in your system to regulate the power flow from the solar panels to the pump. The control unit acts as a protective measure, preventing the pump from damage due to voltage irregularities and ensuring optimal performance.
8. Testing and Calibration:
Before putting the system into full operation, conduct thorough testing. Check for any leaks, confirm that the pump is working correctly, and ensure the control unit is regulating power effectively. Calibrate the system as needed to address any issues.
9. Regular Maintenance:
Implement a routine maintenance schedule to keep the solar water pump system in optimal condition. Tasks may include cleaning solar panels, checking connections, inspecting the pump, and ensuring the control unit is functioning correctly.
4. How Long Does It Take to Install a Solar Water Pump?
The duration of a solar water pump installation varies based on factors such as the installer’s experience, site conditions, and system complexity. On average, a professional installer may complete the setup in one to two days. This timeframe underscores the efficiency and relatively quick implementation of solar water pump systems.
The duration of installing a solar water pump can vary based on several factors, including the complexity of the system, the installer’s experience, site conditions, and the specific requirements of the installation. On average, a professional installer can complete the installation process within one to two days.
Here is a breakdown of the factors influencing the installation timeline:
- System Complexity: The complexity of the solar water pump system, including the number of components, the need for additional accessories, and the sophistication of the control unit, can impact the installation time.
- Installer Experience: The expertise and experience of the installer play a significant role. A seasoned professional with prior experience in solar water pump installations is likely to complete the process more efficiently than someone with less experience.
- Site Conditions: The characteristics of the installation site, such as accessibility, terrain, and proximity to the water source, can affect the installation timeline. Sites with challenging conditions may require more time for proper setup.
- Preparedness and Planning: Adequate preparation, including having all necessary components on hand and a well-thought-out installation plan, can contribute to a faster and smoother installation process.
- Size of the System: The size and capacity of the solar water pump system also factor into the installation time. Larger systems may involve more components and connections, requiring additional time for assembly and configuration.
How to Install Solar Water Pump with Battery?
Solar water pumps are specially designed to utilize DC electricity from solar panels. The pumps must work during low light conditions, when power is reduced, without stalling or overheating. Low volume pumps use positive displacement (volumetric) mechanisms which seal water in cavities and force it upward. The submersible pump can realize working at sunrise and resting at sunset, no need any person look after it, no need diesel, no need power grid, and can be used with irrigation equipments to save water, energy and cost.
So, today we will talk about how to install a solar water pump with battery.
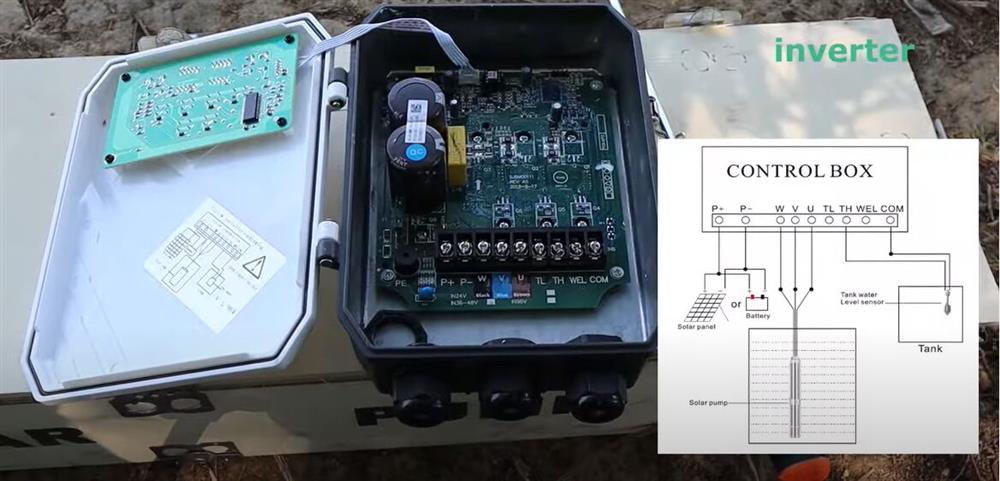
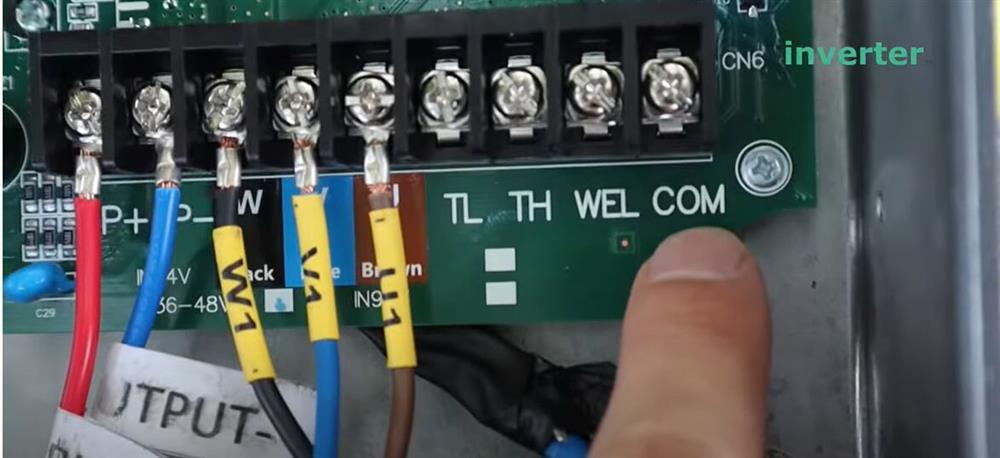
Wiring
- Connecting the power cable of the motor to the W, V and U terminals.
- Conneting the DC power supply to P+, P-, (battery or solar panel).
How to install the solar water pump with battery?
- We using a 48VDC battery, connecting the connector to the solar water pump outlet. If the pump will be put in deep water, it shold be lifted by ropes. (Becareful not to use the power cable to lift pump).
- Putting the pump into the water. When in pond/ pool/ river/ lake, the water inlet of the pump must below the water level.
- When the solar pump is putting into a narrow deep well, the water inlet of the pump should be 7-8 meters lowers than the water level so that the pump can pump enough water. The controller automatically recognizes that the pump is connected the battery or solar panel.
- Then press”ON”, the controller starts to work.
- Press “switch” to view the current speed. The outlet bagan to spray water.
- Press ▼ to decrease the motor speed. (When the power supply is battery.)
- Press “Enter” to confirm the setting. Then the water discharge is obviously reduced. The mimimum speed that canbe set is 1000 rpm.
- Switching to check the current is 0.7A, power is 38W, and voltage is 49.9V.
- Press the “OFF” to stop pumping. (When the power supply is solar penel, the pump will automatically start or stop).
- Connect the level snesor according to the wiring diagram. It is often used in water tanks. The level sensor is onnected to the TH and COM terminals.
When the float switch is lifted by water, the pump stops working. The TANK indicator light on the controller panel is always on. After 30 minutes, the solar water pump will automatically restart and pump water.
If you want to know more details about the installing
solar water pump with battery, please check the video below.